To safely change a tracheostomy tube at home, you’ll need to gather sterile supplies and prepare a clean workspace first. Position your patient semi-upright at 30-45 degrees, then carefully remove the current tube after deflating the cuff. Insert the new tube promptly at a 45-degree angle with steady pressure, inflate the cuff, and secure with ties. Verify proper placement by listening for clear breathing and observing chest movement. Monitor continuously for complications while documenting essential signs—understanding these fundamentals sets the foundation for mastering advanced troubleshooting techniques.
Key Takeaways
- Gather all necessary supplies and create a sterile workspace in a clean, well-lit area before beginning the procedure.
- Position patient semi-upright at 30-45 degrees, deflate cuff completely, and remove current tube with smooth, curved motion.
- Insert new tube promptly at 45-degree angle, inflate cuff immediately, and secure with properly tensioned ties.
- Verify correct placement by listening for clear breathing sounds and observing symmetrical chest rise and fall.
- Keep a close eye on your loved one for the first 30 minutes after the tube change. Watch them breathe in and out. Look at their chest to make sure both sides move evenly. Listen for any unusual sounds or whistling. After that first half hour, check on them every hour for the next 4 to 6 hours. You’re looking for signs that everything is working smoothly—easy breathing, normal skin color, and a relaxed appearance. If you notice any trouble breathing, changes in color, or if something just doesn’t feel right, get help immediately. Trust your instincts. You know your loved one better than anyone.
Caring for someone with a tracheostomy takes courage, patience, and love. You’re doing an incredible job, and you don’t have to do it alone. There are people who understand what you’re going through and want to support you every step of the way. Whether you have questions, need guidance, or just want someone experienced to walk alongside you, help is available.
If you or a loved one need help, don’t wait. Reach out to Skilled Trach Care today at (561) 677-8909 or email us at info@skilledtrachcare.com.
Gather All Necessary Supplies and Prepare Your Workspace
Before performing any tracheostomy tube change, you’ll need to systematically assemble your supplies and create a sterile workspace to minimize infection risk and guarantee procedural success.
Your thorough supply checklist should include a new tracheostomy tube with inner cannula, obturator, tube ties or securing device, sterile gloves, gauze pads, saline solution, suction catheter, and emergency backup tube one size smaller.
Effective workspace organization requires selecting a clean, well-lit area away from high-traffic zones. Sanitize all surfaces with appropriate disinfectant, then arrange supplies within arm’s reach on a sterile towel.
Position adequate lighting to guarantee clear visualization throughout the procedure. Wash your hands thoroughly and don sterile gloves before handling any equipment.
This methodical preparation establishes the foundation for safe, successful tube changes.
Position the Patient and Remove the Current Tracheostomy Tube
With your supplies organized and workspace prepared, proper patient positioning forms the foundation for safe tube removal.
Position your patient in a semi-upright position at 30-45 degrees to enhance breathing mechanics and reduce aspiration risk. Confirm their neck is slightly extended but not hyperextended, maintaining natural alignment for best access to the tracheostomy site.
Before removal, assess the patient’s respiratory status and confirm they’re comfortable and calm.
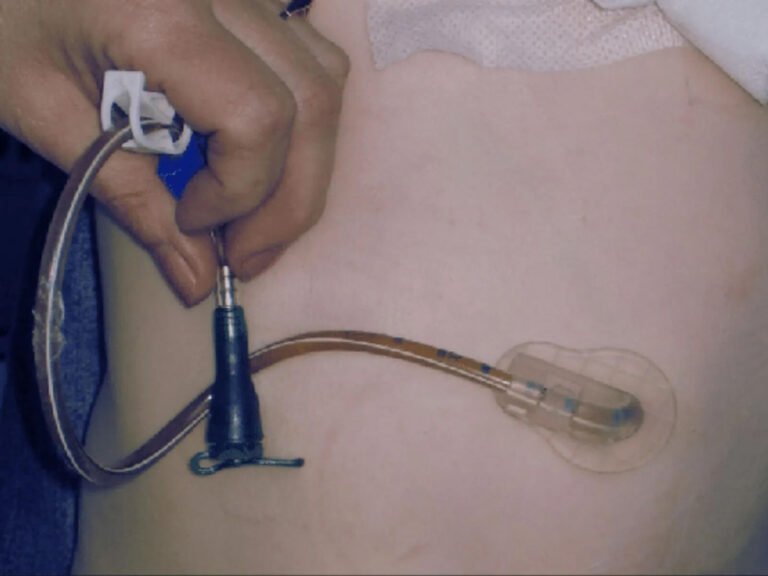
Cut or untie the tracheostomy ties carefully, maintaining control of the tube throughout. Deflate the cuff completely by withdrawing all air through the pilot balloon.
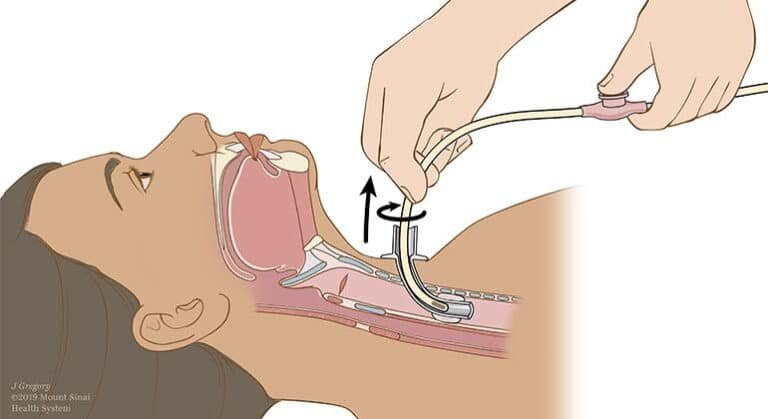
Gently remove the tube using a smooth, curved outward motion following the tube’s natural trajectory. This technique minimizes tissue trauma and supports effective tube maintenance while prioritizing patient comfort during the process.
Insert the New Tracheostomy Tube Using Proper Technique
Insert the new tracheostomy tube promptly after removal to minimize exposure time and maintain airway security.
Hold the tube at a 45-degree angle to the neck, gently guiding it downward and backward following the natural curve of the trachea. Apply steady, controlled pressure without forcing entry. You’ll feel slight resistance as the tube passes through the stoma—this is normal.
Position the tube at 45 degrees, guide gently along the trachea’s natural curve with steady pressure—expect normal resistance.
Once inserted, immediately inflate the cuff if present, using the prescribed volume. Secure the tube with clean ties or holder, ensuring proper tension that allows one finger’s width underneath.
Throughout these tube insertion techniques, monitor your patient’s breathing and oxygen saturation continuously.
Prioritize patient comfort by working efficiently and communicating reassuringly during the procedure to reduce anxiety.
Secure the Tube and Verify Proper Placement
Placement assessment involves several critical verification steps.
Listen for clear, quiet breathing sounds through the tube. Observe symmetrical chest rise and fall with each breath. Check that the tube’s flange sits flush against the neck without gaps.
Confirm the patient can breathe comfortably without increased effort or distress. If you notice any breathing difficulties, unusual sounds, or the patient appears uncomfortable, contact your healthcare provider immediately for guidance and potential emergency intervention.
Clean Up and Monitor the Patient for Complications
Begin systematic patient monitoring immediately following the tube change.
Assess respiratory status continuously for the first 30 minutes, then hourly for the next 4-6 hours.
Monitor breathing patterns closely during the initial half-hour, followed by systematic hourly assessments over the subsequent four to six hours.
Watch for complication signs including difficulty breathing, excessive coughing, bleeding around the stoma site, subcutaneous emphysema, or changes in oxygen saturation levels.
Document essential signs, including respiratory rate, oxygen saturation, and overall patient comfort.
If you notice any concerning symptoms, contact the healthcare team immediately.
Never hesitate to seek professional assistance when patient safety is compromised.
Conclusion
You Did It! What Comes Next
You’ve just finished changing the tracheostomy tube – and that took real courage. Now take a deep breath. Your job isn’t quite done yet.
For the next hour, stay close and watch carefully. Look for any signs that something might be wrong: trouble breathing, strange sounds, bleeding, or if the tube seems out of place. Write down what time you finished and anything important you noticed.
If you see heavy bleeding, hear worrying sounds, or notice breathing problems, call your doctor right away. Don’t hesitate – it’s always better to be safe.
By following these steps each time you change the tube, you’re doing something amazing. You’re keeping your tracheostomy clean and working properly. You’re protecting against infections. Most importantly, you’re taking control and giving yourself or your loved one the best possible care.
Remember, you’re not walking this path alone. Learning to care for a tracheostomy can feel overwhelming at first – like learning a new language. But with each tube change, you’re getting stronger and more confident. You’re becoming an expert in your own care.
If you or a loved one need help, don’t wait. Reach out to Skilled Trach Care today at (561) 677-8909 or email us at info@skilledtrachcare.com